Sunday, December 21, 2008

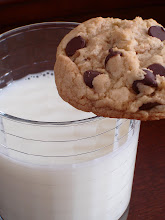
Thick & Chewy Chocolate Chip Cookies


Everyone including myself is always on the search for the perfect chewy chocolate chip cookie! After many tries at recipes I flagged on the Internet, from a few of my many cook books and from friends, I turned to my collection of Cook's Illustrated magazine. I think I found (for now) what I believe to be the best recipe out there. They key to this recipe is using melted then cooled butter. Melting the butter separates the fat and water allowing the flour proteins to grab hold of the water forming elastic gluten sheets within the cookie. The result is the perfect chewy yet tender-crisp cookie. Enjoy!


Thick & Chewy Chocolate Chip Cookies
recipe from Cook's Illustrated American Classics 2008

Ingredients

2 1/8 cups all-purpose flour (2 cups plus 2 tablespoons)
1/2 teaspoon table salt
1/2 teaspoon baking soda
12 tablespoons unsalted butter, melted and cooled slightly (1 1/2 sticks)
1 cup packed brown sugar (light or dark)
1/2 cup granulated sugar
1 large egg plus one yolk
2 teaspoons vanilla extract
1-1 1/2 cup semi sweet chocolate chips

Directions
1. Adjust oven racks to upper- and lower-middle positions. Heat oven to 325 degrees. Line your baking sheets with parchment paper.
2. Whisk flour, salt and baking soda together in medium bowl; set aside.
3. In a standing mixer with a paddle attachment, mix butter and sugars until blended. Mix in egg, yolk and vanilla until combined. Add dry ingredients & mix until combined. Stir in chips to taste.
4. Roll scant 1/4 cup dough into ball. Holding dough ball using fingertips of both hands, pull into two equal halves. Rotate halves ninety degrees and with jagged surfaces exposed, join halves together at their base forming a single cookie, being careful not to smooth dough’s uneven surface. Place formed dough onto baking sheets with parchment, about nine dough balls per sheet.
5. Bake, reversing cookie sheets’ positions halfway through baking, until cookies are light golden brown and outer edges start to harden yet centers are still soft and puffy, 15 to 18 minutes (start checking at 13 minutes). Cool cookies on baking sheet.

Saturday, August 16, 2008

Magnolia Cupcakes


When my husband and I were invited to our little cousin's 3rd birthday party last week, I knew it would be the perfect time to try out that famous Magnolia cupcake recipe that everyone talks about! Although they were a huge hit with everyone, in my opinion (having had the real thing) they were OK...nothing to flip over!


Magnolia Cupcakes

CUPCAKES:
1 1/2 cups self-rising flour
1 1/4 cups all-purpose flour
1 cup (2 sticks) unsalted butter, softened
2 cups sugar
4 large eggs, at room temperature
1 cup milk
1 teaspoon vanilla extract

Preheat oven to 350 degrees. Line two 12-cup muffin tins with cupcake papers.
In a small bowl, combine the flours. Set aside.
In a large bowl, on the medium speed of an electric mixer, cream the butter until smooth. Add the sugar gradually and beat until fluffy, about 3 minutes. Add the eggs, one at a time, beating well after each addition. Add the dry ingredients in three parts, alternating with the milk and vanilla. With each addition, beat until the ingredients are incorporated but do not overbeat. Using a rubber spatula, scrape down the batter in the bowl to make sure the ingredients are well blended. Carefully spoon the batter into the cupcake liners, filling them about three-quarters full. Bake for 20–25 minutes, or until a cake tester inserted in the center of the cupcake comes out clean.
Cool the cupcakes in the tins for 15 minutes. Remove from the tins and cool completely on a wire rack before icing.

VANILLA ICING
1 cup (2 sticks) unsalted butter, softened
6 to 8 cups confectioners’ sugar
1/2 cup milk
2 teaspoons vanilla extract

Place the butter in a large mixing bowl. Add 4 cups of the sugar and then the milk and vanilla. On the medium speed of an electric mixer, beat until smooth and creamy, about 3-5 minutes. Gradually add the remaining sugar, 1 cup at a time, beating well after each addition (about 2 minutes), until the icing is thick enough to be of good spreading consistency. You may not need to add all of the sugar. If desired, add a few drops of food coloring and mix thoroughly. (Use and store the icing at room temperature because icing will set if chilled.) Icing can be stored in an airtight container for up to 3 days.


Sunday, June 22, 2008

Not Yo Mama's Banana Pudding


I've been dying to try this recipe ever since I saw Mama Paula make this on her television show but there never seemed to be the perfect time especially since the hubby and I started our new exercise and diet regime (10 pounds down! whewww hewww!) Ahhhem sorry that was the attention whore side getting the best of me. Anyway! When my newly married cousins (who are now expecting!!! There I go again!) invited us over for dinner today, I knew I had to come up with something special for dessert. Knowing Joey LOVES anything banana and knowing Paula never disappoints, I knew this would be the perfect recipe! I can't wait to sink my teeth into this one!


Not Yo Mama's Banana Pudding
From: The Lady & Sons Just Desserts by: Paula Deen

2 bags Pepperidge Farm Chessmen cookies
6 to 8 bananas, sliced 2 cups milk
1 (5-ounce) box instant French vanilla pudding
1 (8-ounce) package cream cheese, softened
1 (14-ounce) can sweetened condensed milk
1 (12-ounce) container frozen whipped topping thawed, or equal amount sweetened whipped cream

Line the bottom of a 13 by 9 by 2-inch dish with 1 bag of cookies and layer bananas on top. In a bowl, combine the milk and pudding mix and blend well using a handheld electric mixer. Using another bowl, combine the cream cheese and condensed milk together and mix until smooth. Fold the whipped topping into the cream cheese mixture. Add the cream cheese mixture to the pudding mixture and stir until well blended. Pour the mixture over the cookies and bananas and cover with the remaining cookies. Refrigerate until ready to serve.

Sunday, April 6, 2008

Long Overdue Update! Decorator's Dream Cookies


I just realized today that it's been OVER a month since I last updated this blog....all for a good reason, I promise!

Quick recap:
You see, marriage + starting a new job + house hunting + the love of baking = not enough time in the day multiplied by a few (or more) extra pounds on the tush. Not good. So i'm proud to say that I have just completed my 2nd full week of "Core" and i'm feeling great! However, this does mean no more baking for a while or until the next family function rolls around. Not to worry though, I do still have lots of photos and recipes to blog about from the past. So here's one that I managed to pull up.

I made these cookies for a bridal shower for a very close friend of mine. It was actually my first attempt at roll-out cookies...not bad right? I just need to work on my royal icing piping skills! This recipe comes from a The King Arthur Flour Cookie Companion cookbook given to me by my lovely sister for Christmas along with the awesomist cookbook holder EVER!

Decorator's Dream Cookies

1 cup unsalted butter
2 cups confectioners' sugar or glazing sugar
2 tablespoons light corn syrup
1/2 teaspoon salt
1/8 teaspoon Fiori di Sicilia
1 large egg
3 1/2 cups Unbleached All-Purpose Flour

In a medium-sized mixing bowl, cream together the butter, sugar, corn syrup, salt, and flavoring until light and fluffy. Beat in the egg. Add the flour, and beat until smooth. Divide the dough in half, wrap it well, and refrigerate for 1 hour.Take the dough out of the refrigerator, and flour your work surface and the dough. Roll it out very thinly (about 1/8-inch thick), using flour to keep it from sticking to the table or rolling pin. Cut out shapes, transfer to ungreased cookie sheets, and bake them in a preheated 350°F oven until just slightly brown on the edges, or until they feel firm, about 8 to 10 minutes. Let the cookies cool on the baking sheet for several minutes, or until they're set. Transfer them to a rack to cool completely.Cookies may be iced after baking, or sprinkled with sugar before baking. Or sandwich them together, using jam or frosting, to make linzer cookies.

Yield: about 4 dozen 2-inch cookies, or 1 1/2 dozen larger decorated cookies.

Sunday, March 2, 2008

Raspberry Crumb Cake


Wahhhoooo for me!!!! I recently left a job that I was at for almost 10 years this past December. Tough decision, but it had to be done. Starting a new one though was even tougher! It had been a long time since I was "The New Girl." Oh my god! Was I going to fit in? What would they think of me? What if I had nothing in common with anyone? I had formed such a close bond with some of my former co-workers, most of whom I consider very close friends, and was terrified that I wasn't going to "connect" as well with my new colleagues. Boy was I totally wrong. I was welcome with open arms from the first moment I stepped foot into the office. We hit it off instantly! A huge weight was lifted from my shoulders...two weeks of anxiety gone!

Of course one thing we all bonded over the most was food. I went from one office of four of us talking food & recipes all day, to an office of over ten of us who love food just as much. I fit in like a glove. We take every opportunity we can to celebrate something, whether it's a birthday, holiday or snow day...food is everywhere! There goes that elliptical my husband and I bought after the holidays.

Which brings me to this recipe. While celebrating an office birthday, a fellow co-worker made the most delicious crumb cake I had ever had. Moist, crumbly, buttery with the perfect amount of raspberry...holy lord I had to have the recipe. I even brought a piece home to my husband to try. His eyes crossed when he took his first bite, and with not many bites after because he managed to gobble it down in less than 4.
The next day I was given the recipe, and to my surprise, it used a boxed mix as the base. I'm more of a "from scratch" kind of gal. This totally goes against everything I believe in and had I not tried it for myself, I probably never would have given this cake a chance. Yes! "Doctored" boxed cake mix CAN produce tasty desserts! Who knew?


For the Cake:
1 boxed vanilla cake mix prepared according to package

Crumbs:
(if you like more crumbs, this crumb recipe easily doubles)
1-1/2 cups of flour
1 tsp baking powder
1-1/2 tsp. cinnamon
3/4 cup of sugar
1/2 cup of light brown sugar
1 cup butter

Filling:
Seedless raspberry jam ( I like to use the one that comes in a squeezable bottle, it's easier to spread.)

Directions:
Prepare cake mix according to directions on the box and bake for 20 min.
Mix all the ingredients together until crumbs form. If the mixture does not hold well together add a bit more butter!

Take your cake out after baking for 20 min. and squeeze about 10-12 ounces of the jam on the partially baked cake. Let it sit for about a minute while the jam warms through, then spread the jam evenly on the cake. Top with the crumb mixture and continue to bake an additional 20 minutes. Once completely cooled, dust with powdered sugar.

Saturday, February 16, 2008

Tag, I'm it! Twice!

To say that I'd lose my head if it wasn't attached would be the biggest understatement! Not only was I tagged today by Rachel @ Good Thymes & Good Food but when reading her comment, I realized I was also tagged by Nikki @ Pennies on a Platter too....a few days ago! I'm sorry Nikki! Please forgive me! So because of my screw up, i'm going to post 10 facts about myself instead!

Rules:

1. Link to your tagger and post these rules.
2. Share 5 facts about yourself.
3. Tag 5 people at the end of your post and list their names (linking to them).
4. Let them know they've been tagged by leaving a comment at their blogs.


5 Facts about Me...actually 10.

1. I think i'm the only person in the world that does not watch "Lost."

2. I cringe at the thought of jarred tomato sauce.

3. I do all the cooking and my husband washes all the dishes. It's the one chore I dread the most.

4. I have a mild case of OCD. Before I go to bed: door locks, window locks and stove knobs have to be checked and all drawers must be closed fully as well as all closet doors (not even opened a crack). Oh and I make my hubby do it all! He He.

5. I can't brew a good cup of coffee.

6. 5 months after I got married I got 2nd degree burns on my right hand in a cooking accident! I learned my lesson!

7. I rock at Guitar Hero.

8. I'll never pass on a cookie especially Oreos.

9. I turn into a lunatic when I drive.

10. I excerise with a 5 pound hula hoop. I can hula for 25 minutes straight!


I would like to tag:

1. Nina @ Nina's Kitchen
2. Dori @ The Foodie Fashionista
3. Emiline @ Sugar Plum
4. Jenny @ Jenn's Jumpin Kitchen (fellow Jersey Gal!)
5. Emily @ Rediscovering The Joy Of Cooking

Wednesday, February 6, 2008

Peanut Butter Cup Cookies


My husband and I got married in September of 2006 and up until then, the only baking I did was from a boxed cake mix or a premade roll of cookie dough. It's amazing what getting married does to some people. I managed to turn into one hell of a domestic diva...or as my husband calls me, Betty Crocker. Having a huge wedding in September doesn't leave much in your budget for Christmas shopping in December! I decided to pass up on all the crazy holiday shopping one goes through in the hopes of finding the perfect gift for fellow friends and family. I kept my christmas shopping to a minimum and decided that instead, I would pack up an assortment of homemade cookies as gifts. This also gave me the opportunity to start working on MY holiday baking list.....and what will be my list 30+ years from now when i'm baking for my grandkids! It's important to have the perfect recipes right? Anyway, I came across this one on allrecipes.com by accident (don't ask me how.) I know it's not your typical christmas cookie, but I only decided to give it a try because I actually had ALL the ingredients at home in my pantry and I was extremly bored and felt like I needed to bake. I was so happy I did. Not only are they fabulous, but they're so easy to make and did I mention fabulous? They also hold up very well....perfect for those holiday trays!


Peanut Butter Cup Cookies
recipe from allrecipes.com

INGREDIENTS

1 3/4 cups all-purpose flour
1/2 teaspoon salt
1 teaspoon baking soda
1/2 cup butter, softened
1/2 cup white sugar
1/2 cup peanut butter
1/2 cup packed brown sugar
1 egg, beaten
1 teaspoon vanilla extract
2 tablespoons milk
40 miniature chocolate covered peanut butter cups, unwrapped

DIRECTIONS

Preheat oven to 375 degrees F (190 degrees C).
Sift together the flour, salt and baking soda; set aside.
Cream together the butter, sugar, peanut butter and brown sugar until fluffy. Beat in the egg, vanilla and milk. Add the flour mixture; mix well.
Shape into 40 balls and place each into an ungreased mini muffin pan.
Bake at 375 degrees for about 8 minutes. Remove from oven and immediately press a mini peanut butter cup into each ball. Cool and carefully remove from pan (see note below!)

Note...make sure you allow them to cool for about 10-15 minutes before you try to remove them from the pan or else see below!

Saturday, January 26, 2008

Foodie Blogroll!

I'm happy to announce that I am now part of the Foodie Blogroll! For anyone not familiar with what it is, it's a wonderful "community" of food blogs put together by Jenn of The Left Over Queen. If you love food as much as I do, you MUST take a look at some of the blogs listed (and try your hardest not to lick your computer screen!)...some of them are out of this world! For those interested, the blogroll is listed on the right hand side of this page. Enjoy!